

Introduction
Have you ever typed into a search box and seen instant suggestions pop up? That’s autocomplete in action. It’s not just a fancy feature—it saves time, reduces typos, and improves user experience dramatically.
If you’re building websites with Elementor, you may have noticed something missing: Elementor’s form widget doesn’t come with built-in autocomplete support. Most tutorials online show how to add autocomplete by creating a custom HTML input or using third-party plugins.
But what if you want to keep things native and use the actual Elementor form field? That’s exactly what we’ll cover in this guide. In fact, this tutorial is one of the first to explain how to implement autocomplete suggestions inside an Elementor form field without relying on external plugins. We’ll use jQuery UI Autocomplete plus a little bit of PHP and MySQL to pull suggestions dynamically from a database.
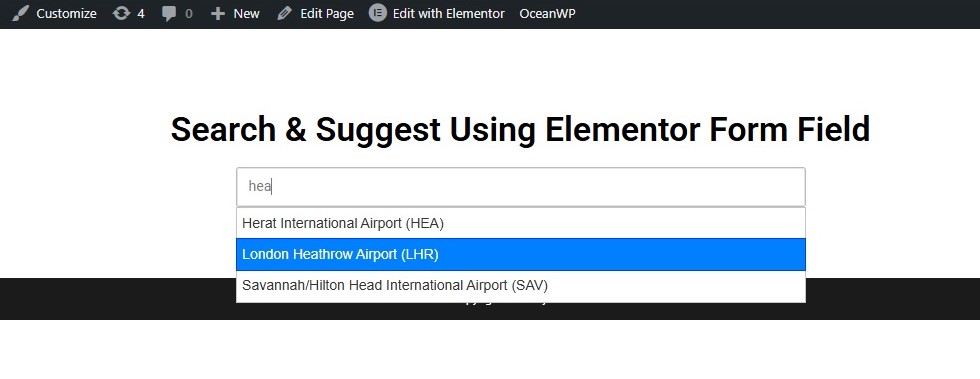
By the end of this tutorial, you’ll have a working form where typing just a few letters brings up relevant suggestions (like airport names and IATA codes), all inside your Elementor form field.
Why Add Autocomplete in Elementor Forms?
Before jumping into the steps, let’s understand why autocomplete is worth your time:
- Faster input: Users don’t need to type full names (e.g., “John F. Kennedy International Airport”).
- Reduced errors: Prevents typos and ensures accurate data entry.
- Improved UX: Visitors are used to autocomplete from Google search, flight booking, and maps.
- Dynamic data: You can pull live suggestions from your database instead of hardcoding options.
This is especially useful for travel booking forms, product search fields, city selectors for prayer times, or any situation where your dataset is too large for a static dropdown.
Step 1: Setting Up the Database
First, you’ll need to a create a database in phpMyAdmin (either you are using localhost or hosting)

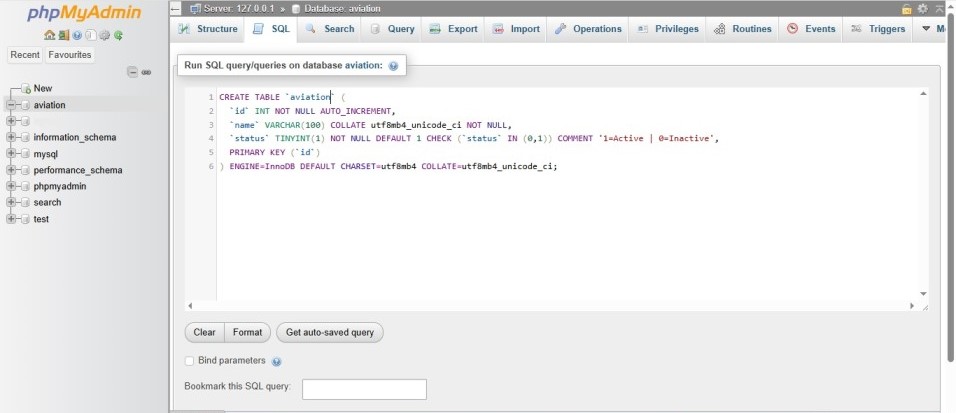
Then create a table in the example “aviation” database
Here’s a sample SQL table you can use:
CREATE TABLE `aviation` (
  `id` INT NOT NULL AUTO_INCREMENT,
  `name` VARCHAR(100) COLLATE utf8mb4_unicode_ci NOT NULL,
  `status` TINYINT(1) NOT NULL DEFAULT 1 COMMENT '1=Active | 0=Inactive',
  PRIMARY KEY (`id`)
) ENGINE=InnoDB DEFAULT CHARSET=utf8mb4 COLLATE=utf8mb4_unicode_ci;
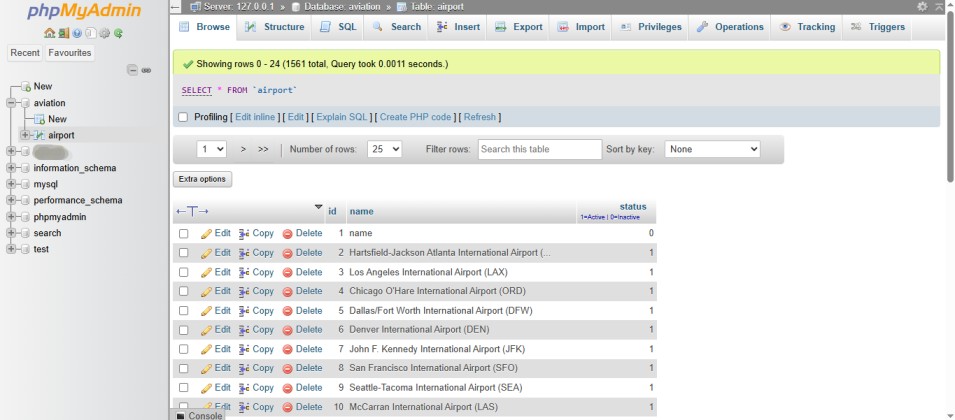
Now by using import option upload the airport list of .csv file and then table should look like this
Step 2: Add Elementor Form Field
In Elementor:
- Drag a Form widget onto your page.

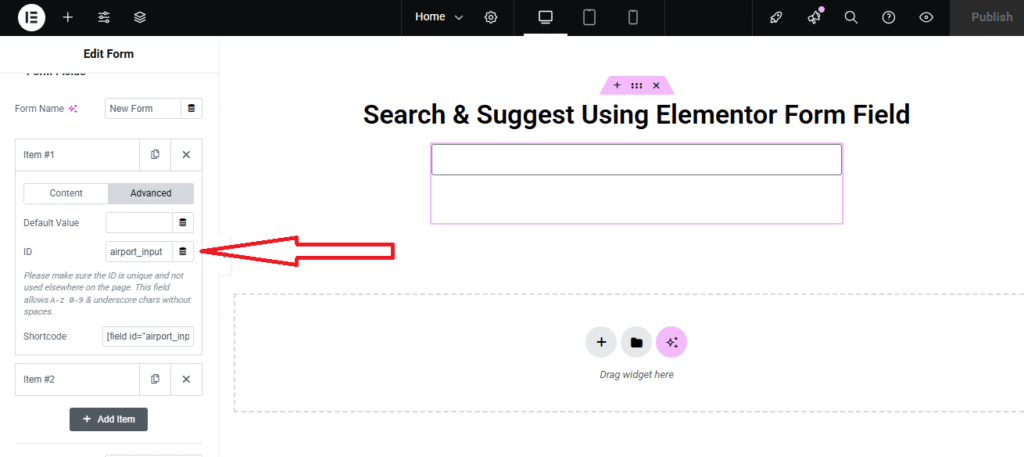
- Set Name field type as text where we want autocomplete and remove extra two fields.

- Under Advanced → ID, give it a id like
airport-input.
Step 3: Load jQuery UI in WordPress/Elementor
WordPress already includes jQuery, but we need jQuery UI (Autocomplete) plus its CSS.
Add this inside your Elementor HTML field
<!-- jQuery UI CSS -->
<link rel="stylesheet" href="https://ajax.googleapis.com/ajax/libs/jqueryui/1.13.2/themes/base/jquery-ui.css">

<!-- jQuery UI JS -->
<script src="https://ajax.googleapis.com/ajax/libs/jqueryui/1.13.2/jquery-ui.min.js"></script>

Note: Don’t load jQuery itself, since WordPress already provides it.
Step 4: Initialize Autocomplete
Now let’s bind autocomplete to our Elementor HTML form field. Add this JS snippet (in the same HTML form field or via custom JS file):
<script>
jQuery(function($) {
    $(".airport-input").autocomplete({
        source: "fetchData.php",
        minLength: 2,
        delay: 0,
        autoFocus: true
    });
});
</script>
Here’s what’s happening:
.airport-inputtargets the form field.source: "fetchData.php"tells jQuery where to fetch data from.minLength: 2only triggers autocomplete after 2 characters.delay: 0makes it instant.autoFocus: truehighlights the first suggestion automatically.
Step 5: Create the PHP Backend
Next, we’ll build fetchData.php to query the database and return results as JSON.
Create a .php file, add this code in it and add this file in htdocs folder through phpMyadmin
<?php
// Database configuration
$dbHost     = "localhost";
$dbUsername = "root";
$dbPassword = "";
$dbName     = "aviation";

// Create database connection
$db = new mysqli($dbHost, $dbUsername, $dbPassword, $dbName);

// Check connection
if ($db->connect_error) {
    die("Connection failed: " . $db->connect_error);
}

// Get search term safely
$searchTerm = isset($_GET['term']) ? $_GET['term'] : '';

// Prepare SQL query (secure against injection)
$stmt = $db->prepare("SELECT id, name FROM airport WHERE name LIKE CONCAT('%', ?, '%') AND status = 1 ORDER BY name ASC");
$stmt->bind_param("s", $searchTerm);
$stmt->execute();
$result = $stmt->get_result();

// Build results
$airportData = array();
while ($row = $result->fetch_assoc()) {
    $airportData[] = array(
        "id"    => $row['id'],
        "value" => $row['name']
    );
}

// Set JSON header & return results
header('Content-Type: application/json');
echo json_encode($airportData);
?>
Step 6: Test and Customize
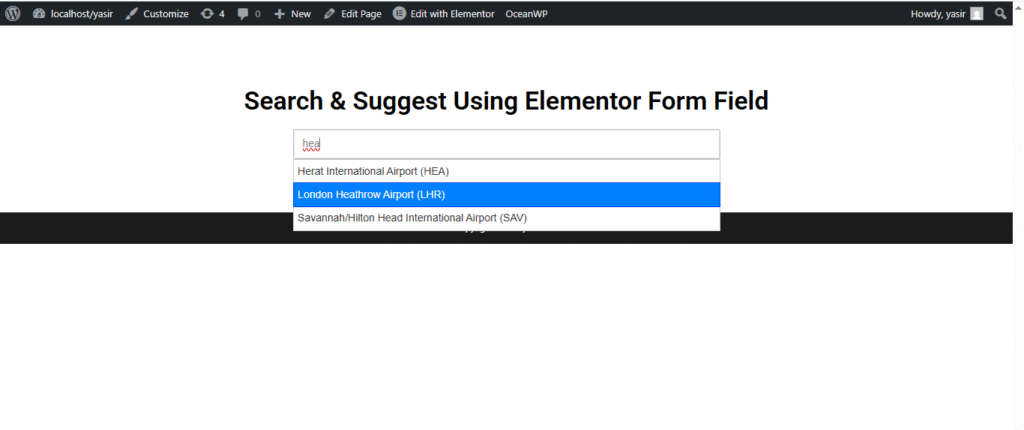
Now, open your Elementor form, type any character and you should instantly see result appear in the dropdown.
Final Thoughts
Adding Elementor form field autocomplete is a powerful way to enhance user experience on your website. Instead of asking visitors to type full entries or scroll through long dropdowns, you can give them real-time, accurate suggestions directly in the form field.
What makes this approach unique is that we’re not relying on external plugins or static HTML inputs. Instead, we’ve integrated autocomplete directly into Elementor’s form field, keeping everything native, clean, and professional.
As a next step, you could expand this into a full booking or search system, or even integrate it with APIs for live data.
👉 That’s it — now you know how to build Elementor form field autocomplete from scratch. If you’d like help implementing it on your site, check out our web design services or reach out for support.